


Transforming furniture has become a popular way to breathe new life into dated pieces whilst avoiding the expense of purchasing new items. One particularly clever project involves converting an old table into a functional, attractive countertop that can serve multiple purposes throughout the home. This method has gained traction amongst DIY enthusiasts who appreciate both the cost-effectiveness and the satisfaction of creating something unique. The process requires minimal specialist knowledge, making it accessible to those with basic woodworking skills. By following a straightforward approach, anyone can achieve professional-looking results that rival expensive shop-bought alternatives. The transformation not only saves money but also contributes to sustainable living by repurposing existing furniture rather than discarding it.
Quick transformation of an old table: the essentials
Understanding the basic concept
The fundamental principle behind this transformation involves taking the solid surface of an existing table and adapting it for use as a countertop in various settings. The method works particularly well with older wooden tables that possess sturdy construction and quality materials. These vintage pieces often feature superior timber compared to modern mass-produced furniture, making them ideal candidates for conversion. The table’s existing dimensions typically suit countertop applications without requiring extensive modifications.
Assessing your table’s suitability
Before beginning any work, careful evaluation of the table’s condition determines whether the project will succeed. Several factors require consideration:
- The structural integrity of the wood, checking for rot, severe warping or extensive damage
- The table’s dimensions and whether they suit the intended countertop location
- The wood type and grain pattern, which affects the final aesthetic
- The presence of veneers versus solid wood construction
- The table’s overall weight and whether additional support will be needed
Tables constructed from solid hardwoods such as oak, maple or walnut prove most successful for conversion. These materials withstand the rigours of countertop use whilst developing an attractive patina over time. Veneered tables can work but require more delicate handling during preparation to avoid damaging the thin surface layer.
Planning the installation location
Identifying where the new countertop will be installed influences the entire project approach. Kitchen applications demand different considerations than bathroom or workspace installations. The surrounding décor, available space and intended use all shape decisions regarding finish, edge treatment and mounting methods. Taking precise measurements ensures the converted table fits properly within the designated area without requiring last-minute adjustments.
Once the initial assessment confirms the project’s viability, gathering the appropriate materials becomes the next crucial step.
Materials and tools required for a new countertop
Essential tools for the job
Completing this transformation requires a selection of basic woodworking tools, most of which DIY enthusiasts already own. The following items prove necessary:
- Orbital or belt sander with various grit sandpaper (80, 120, 180 and 220 grit)
- Clean cloths and tack cloth for dust removal
- Paintbrushes or foam applicators in various sizes
- Measuring tape and pencil for marking
- Protective equipment including safety goggles, dust mask and gloves
- Screwdriver set for removing table legs if necessary
Materials for surface treatment
The quality of materials used directly impacts the durability and appearance of the finished countertop. Essential supplies include:
| Material | Purpose | Approximate quantity |
|---|---|---|
| Wood filler | Repairs cracks and imperfections | 1-2 tubes |
| Wood stain (optional) | Enhances colour and grain | 1 litre |
| Polyurethane or epoxy resin | Creates protective sealed surface | 2-3 litres |
| Mineral spirits | Cleaning and thinning | 500ml |
| Mounting brackets | Securing countertop to wall | 4-6 units |
Choosing the right finish
The protective finish represents perhaps the most critical material decision. Polyurethane offers excellent durability and water resistance, making it suitable for most applications. Oil-based versions provide superior protection but require longer drying times and produce stronger odours. Water-based polyurethane dries quickly with minimal smell but may require additional coats. Epoxy resin creates an exceptionally tough, glass-like surface ideal for high-use areas, though it demands careful application to avoid bubbles and uneven coverage.
With materials assembled and tools prepared, attention turns to preparing the table surface for its new role.
Preliminary preparation: sanding and cleaning
Removing existing finishes
The first practical step involves stripping away old paint, varnish or polish that covers the table surface. This process reveals the natural wood beneath and creates a clean canvas for refinishing. Beginning with coarse 80-grit sandpaper removes the bulk of old finish efficiently. The sander should move steadily across the surface following the wood grain direction to minimise visible scratches. Applying consistent pressure prevents creating dips or uneven areas that become apparent in the final result.
Progressive sanding technique
Achieving a smooth, professional surface requires working through progressively finer sandpaper grits. This methodical approach eliminates scratches from coarser papers whilst gradually refining the wood texture:
- 80-grit removes old finish and major imperfections
- 120-grit smooths the surface and reduces visible scratches
- 180-grit further refines the texture
- 220-grit creates the final smooth surface ready for finishing
Between each sanding stage, wiping the surface with a tack cloth removes accumulated dust that would otherwise interfere with subsequent sanding or finishing steps. Adequate lighting helps identify remaining rough patches or areas requiring additional attention.
Repairing damage and imperfections
Once sanding exposes the bare wood, any cracks, gouges or holes become clearly visible. Wood filler matched to the timber colour fills these defects effectively. Applying slightly more filler than necessary compensates for shrinkage during drying. After the filler cures completely, sanding it flush with the surrounding surface creates an invisible repair. Deep damage may require multiple filler applications, with sanding between each layer.
Final cleaning before application
Thorough cleaning removes all sanding dust and debris that would compromise the finish quality. Vacuuming the surface followed by wiping with mineral spirits on a clean cloth ensures complete cleanliness. The table should then dry completely in a dust-free environment before proceeding to the application phase.
With the surface properly prepared, the actual transformation into a functional countertop can begin.
Application: turning the table into a countertop
Optional staining for colour enhancement
If the natural wood colour requires modification, applying stain before the protective finish achieves the desired tone. Stain should be applied evenly using a brush or cloth, working with the grain direction. Allowing the stain to penetrate for the manufacturer’s recommended time before wiping away excess ensures consistent colour. Testing stain on an inconspicuous area or scrap piece prevents unexpected colour results on the visible surface.
Applying the protective finish
The protective coating transforms the prepared wood into a durable countertop surface capable of withstanding daily use. For polyurethane applications, the first coat should be slightly thinned with mineral spirits to improve penetration and adhesion. Using a high-quality brush or foam applicator, the finish is applied in thin, even coats following the wood grain. Multiple thin coats prove superior to fewer thick applications, which tend to drip, bubble or cure unevenly.
Sanding between coats
After each coat dries completely, light sanding with 220-grit sandpaper creates mechanical adhesion for subsequent layers. This step also removes any dust particles or imperfections that settled during drying. Wiping away sanding dust with a tack cloth prepares the surface for the next coat. Most projects require three to five coats for adequate protection, particularly in high-use applications.
Mounting the countertop
Once the final coat cures fully, installing the countertop requires secure mounting appropriate to the location. Wall-mounted applications typically use heavy-duty brackets attached to wall studs, with the countertop secured from beneath using screws. The table legs may be removed entirely or shortened if the countertop will rest on cabinetry or other support structures. Ensuring level installation prevents items from rolling off and creates a professional appearance.
The basic transformation complete, several finishing touches elevate the project from functional to stylish.
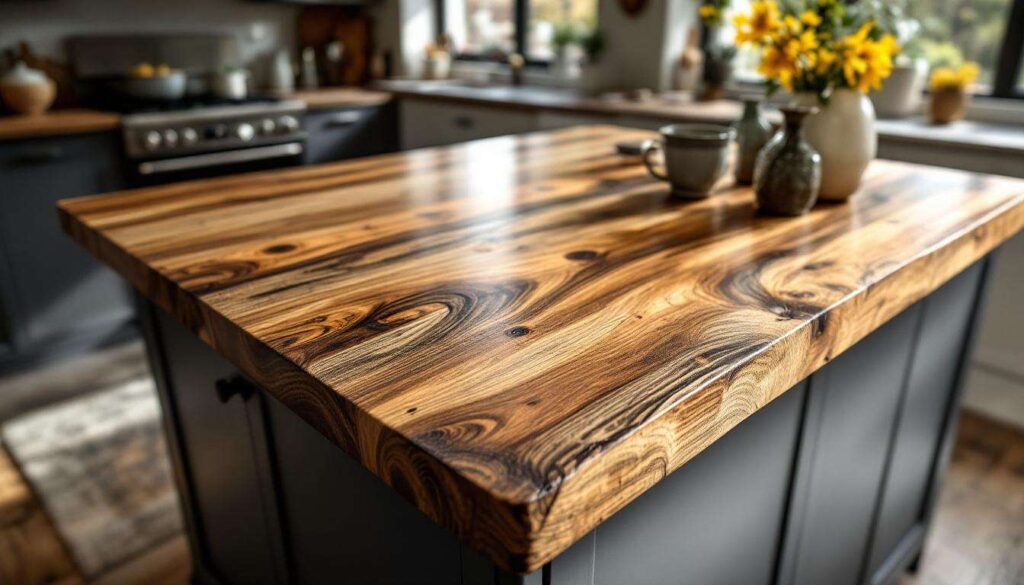
Finishing touches and tips for a modern look
Edge treatments for visual appeal
The countertop edges significantly influence the overall aesthetic. Several options create different visual effects:
- Rounded edges using a router provide a softer, traditional appearance
- Bevelled edges add subtle sophistication and visual interest
- Square edges maintain a clean, contemporary look
- Waterfall edges extending down the sides create a seamless, modern statement
Edge treatment should occur before applying the protective finish to ensure complete coverage and protection of all surfaces.
Adding modern hardware
If the countertop includes storage elements from the original table, updating hardware provides an instant modern upgrade. Contemporary handles, knobs or pulls in brushed metal finishes complement most décor styles. Removing old hardware and filling the holes allows repositioning new fixtures according to current design preferences rather than being constrained by previous placements.
Incorporating contrasting elements
Creating visual interest through contrast elevates the design beyond a simple wood surface. Options include:
- Painting the base or support structure in a complementary colour whilst maintaining the natural wood top
- Adding metal brackets or supports for an industrial aesthetic
- Incorporating tile or stone accents along edges or backsplashes
- Installing LED lighting beneath the countertop for ambient illumination
These enhancements transform a basic conversion into a custom design feature that appears professionally installed rather than homemade.
Ensuring proper curing time
Patience during the final curing phase prevents damage to the new finish. Whilst polyurethane may feel dry to touch within hours, complete curing requires several days to weeks depending on the product and environmental conditions. Avoiding heavy use during this period allows the finish to achieve maximum hardness and durability.
Creating an attractive countertop represents just the beginning, as proper maintenance ensures it remains beautiful for years.
Countertop maintenance: tips to preserve it
Daily cleaning practices
Routine maintenance preserves the countertop’s appearance and extends its functional life. Daily cleaning should involve wiping surfaces with a soft, damp cloth to remove dust and minor spills. Harsh chemicals, abrasive cleaners and scouring pads damage the protective finish over time, gradually diminishing its effectiveness. Mild soap solutions suffice for most cleaning needs, followed by thorough drying to prevent water spots or prolonged moisture exposure.
Protecting against damage
Despite the durable finish, certain precautions prevent unnecessary wear and damage:
- Using cutting boards rather than cutting directly on the surface
- Placing hot items on trivets or heat-resistant pads
- Wiping up spills promptly, particularly acidic substances like wine or citrus juice
- Avoiding dragging heavy objects across the surface
- Using coasters under glasses and cups to prevent ring marks
Periodic refinishing
Even with careful maintenance, countertop surfaces eventually show wear in high-use areas. When the finish appears dull, scratched or worn, light sanding with fine-grit sandpaper followed by applying fresh protective coats restores the surface. This process proves far simpler than the initial conversion since it requires only surface preparation rather than complete stripping. Annual or biennial refinishing maintains the countertop’s appearance and protective qualities indefinitely.
Addressing minor damage
Small scratches, dents or worn areas can be spot-repaired without refinishing the entire surface. Lightly sanding the affected area, applying wood filler if necessary, then touching up with matching finish blends repairs invisibly. Keeping leftover finishing materials from the original project ensures colour and sheen consistency during repairs.
Converting an old table into a stylish countertop demonstrates how creativity and basic skills transform unwanted furniture into functional home features. This approach offers significant cost savings compared to purchasing new countertops whilst providing the satisfaction of completing a meaningful DIY project. The method’s accessibility means those without extensive woodworking experience can achieve professional results through careful preparation and patience. Proper material selection, thorough surface preparation and adequate protective finishing create durable surfaces suitable for various applications throughout the home. Regular maintenance preserves the investment of time and effort, ensuring the converted countertop serves reliably for many years. This smart DIY solution exemplifies how resourcefulness and practical skills create custom home improvements that reflect personal style whilst respecting environmental sustainability through furniture repurposing.